
Percutaneous nephrostomy step by step

Abstract
Percutaneous renal access remains the cornerstone initial step in varied clinical settings. For obtaining the best surgical outcome and minimizing patient morbidity, an appropriate access to the target calyx is needed. Though the site of entry depends upon anatomy of pelvicalyceal system and indication for access, a proper technique should be used for gaining access and at the same time minimizing the associated complications. This article describes our technique of gaining access to the pelvicalyceal system and subsequent percutaneous nephrostomy placement in a stepwise manner.
Keywords
Introduction
Percutaneous nephrostomy (PCN) is a widely used interventional procedure for upper urinary diversion and decompression of the renal collecting system in varied clinical settings. Despite it being a basic urological procedure, it remains technically challenging to insert it in the right way and in the right place. Most of the time it’s because of lack of exposure of the urologist/interventional radiologist to correct technique of PCN placement in a stepwise manner. Goodwin et al.[1] first reported placement of percutaneous trocar (needle) nephrostomy in a hydronephrotic kidney. Since then, many direct and wire guided methods of PCN placement has been elucidated in literature. PCN can be done under flouroscopy, ultrasound (USG) or computed tomography guidance. In this chapter we will describe the USG guided technique of PCN placement in a stepwise manner which is safe, effective and easily reproducible.
Indication for PCN
Obstructive uropathy
Benign causes: impacted ureteric/pelvis calculi with secondary hydronephrosis (HN), uretericstricture disease, pelvic ureteric junction obstruction, HN associated with pregnancy, in transplant patients (e.g. HN due to anastomotic stricture), retroperitoneal fibrosis, urosepsis, pyonephrosis. Malignant causes: HN secondary to tumor of urinary tract, HN secondary to carcinoma cervix/prostate[2,3].
Urinary diversion in an attempt to heal conditions such as malignant/inflammatory fistula, urinary leak or fistulas resulting from trauma, and hemorrhagic cystitis etc.[2,3].
For providing route of access
Chemotherapy, antifungal/antibiotic therapy, benign stricture dilatation, antegrade ureteral stent placement, stone retrieval, endopyelotomy[2,3].
For diagnostic procedures
Whitaker test, antegrade pyelography, biopsy[3].
Pre-operative preparation and a counseling of the patient
Commonly, this procedure is done in local anesthesia (LA). Patient should be well explained about the procedure in detail. Informed consent should be taken beforehand. Bleeding parameters should be within normal limits. Attain intravenous (IV) access and antibiotics should be given half an hour prior to procedure particularly particularly in patients presenting with urosepsis. For uncooperative but willing patient, procedure should be performed under general anesthesia. Relevant radiological images should be reviewed again in order to decide anoptimal approach for renal access.
Detailed step-by-step numbered medical illustration
Step 1: patient positioning
With patient in prone position, a roller pack is placed underneath pelvic bone and another under upper abdomen and chest region (as shown) so as to give adequate stretching around flank region[4,5]. The side to be operated should be brought at the edge of operating table. The area should be cleansed with povidone iodine and draped [Figure 1]. In case of relative contraindication to prone position (compromised cardiorespiratory system etc.), this procedure can be done in supine position as well.
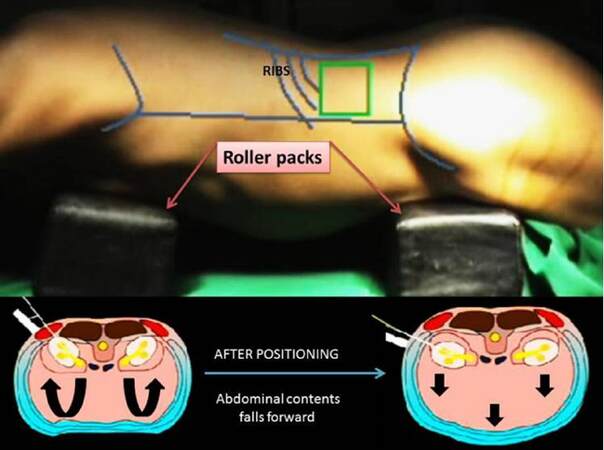
Figure 1. The patient in prone position with roller pack underneath upper abdomen and chest, abdominal contents falls forward so as to give proper access to the kidneys
Step 2: surface marking
If we place PCN in quadrangle of safety formed by posterior axillary line as lateral limit, upper margin of iliac crest as lower limit, lateral margin of paraspinous muscle as medial limit, the 11th and 12th rib border as upper limit, there are less chances of associated intrabdominal visceral injuries [Figure 2][4,5].
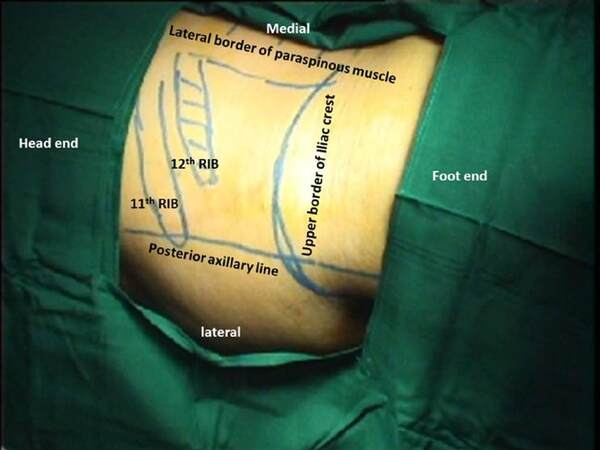
Figure 2. Surface marking (concept of Quadrangle of safety): with the patient in prone position, Quadrangle of safety is formed by posterior axillary line as lateral limit, upper margin of iliac crest as lower limit, lateral margin of paraspinous muscle as medial limit, the 11th and 12th rib border as upper limit
Step 3: USG to decide site of percutaneous puncture
USG of the diseased kidney should be done starting from medial aspect (Para spinal), advancing laterally until the posterior axillary line so as to see posterior calyces first followed by lateral calyces thereafter and thus to have an idea of degree of HN, type of pathology in the renal unit [Figure 3A and B]. We in our institute use 3.5 MHz convex transducer focused at 5-9 cm for adults and 5 MHz transducer focused at 5-7 cm for children. Exact site of puncture depends primarily on the cause of hydronephrosis (HDN) and anatomic landmarks. For simple urinary drainage a lower pole posterior calyx is usually best which can be easily accessed via subcoastal approach. For accessing pelvicureteric junction (PUJ) or upper ureter, upper or middle posterior calyx provides easy access and may require supracoastal puncture. Whenever possible aim should be to puncture posterior calyces and to avoid direct pelvic puncture especially in case of HN due to stone disease. Better visualized area of dilated renal pelvis (in mild HDN) and both renal pelvis and calyx (in moderate to severe HDN) is chosen and marked. The electronic dotted puncture line centered over that area and directed into selected calyx/pelvis. The shortest skin to calyceal distance is chosen keeping skin, renal parenchyma and cup of the calyx, infundibulum, and pelvis in a straight line. USG guided puncture can be done “free hand” but at our institute we always do it with help of puncture guide as it helps in guiding the puncture needle in the right plane and depth[4,5][Supplementary Video 1].
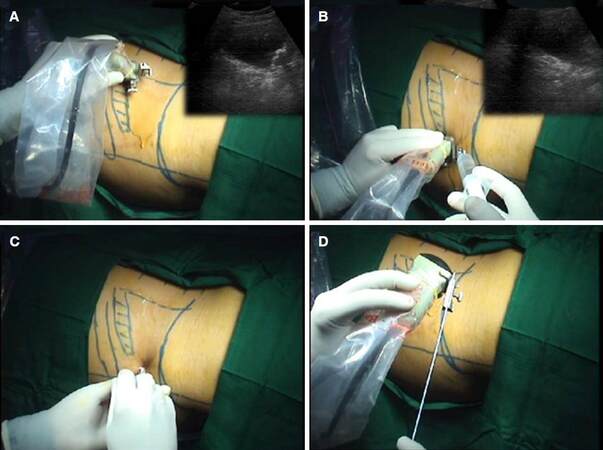
Figure 3. (A) USG of the diseased kidney started from medial aspect and advancing laterally; (B) local anesthetic injected at the site selected for percutaneous access directing along the intended line of tract placement (puncture guide - dotted line in incet); (C) skin incision is made using No. 11 surgical scalpel; (D) a 15-cm, diamond-tipped, 18-gauge two-part trocar needle is engaged in needle attachment connected with the USG probe. USG: ultrasound guidance
[Supplementary Video 1]
Step 4: puncture technique
The 5 mL LA in form of 2% lignocaine is injected at the site selected for percutaneous access and directed in deeper planes along the intended line of tract placement guided by puncture guide [Figure 3B]. Small incision is made with No. 11 surgical scalpel [Figure 3C]. A 15-cm, diamond-tipped, 18-gauge two-part trocar needle is then engaged in needle attachment connected with the USG probe [Figure 3D]. The tip of the needle should be introduced first through the incision site [Figure 4A] and then advanced into deeper plane with needle guide (electronic dotted line on USG screen) turned on and beveled edge of the needle facing the probe (as beveled edge is echogenic and can be easily differentiated on USG). One should appreciate needle advancement along the dotted line into the desired calyx [Figure 4B]. If the needle is angled away from transducer or is off center, it will not be visualized on USG. During passage, one can appreciate two tactile “pops”. The first one corresponds to give way of renal capsule/thoracolumbar fascia and the second one when needle enters collecting system. Needle tip will move corresponding to renal outline during respiration suggesting entry into renal system. As soon as needle stellate is removed urine will egress (nature depends upon etiology), else gently aspirate while coming out of renal system until urine is observed [Figure 4C]. At this point urine sample should be collected and should be sent for appropriate tests. If urine is clear, we proceed with dye study for calyceal delineation [Figure 4D]. Target calyx will be opacified first followed by pelvis and other calyces. If however urine is turbid or pus is coming, we should avoid dye study to prevent bacteremia.
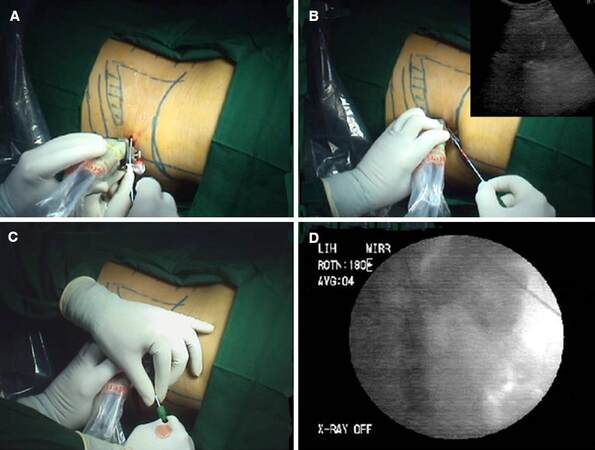
Figure 4. (A) Tip of the needle is engaged first through the skin incision site; (B) as the needle is advanced its tip is seen along the dotted line; (C) egress of urine after removing needle stellate; (D) dye study for calyceal delineation as seen on fluoroscopy
Step 5: guide wire insertion
Once position of needle is ensured, guide wire (0.038-inch diameter) is introduced through the needle under fluoroscopy guidance, trying to negotiate it into the ureter [Figure 5A] or in upper calyx if possible.
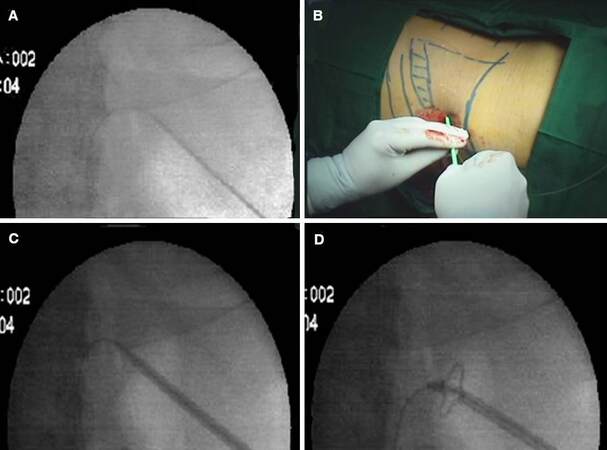
Figure 5. (A) Guide wire is introduced and parked into ureter under fluoroscopy; (B) tract dialatation using single step fascial dilator (14 Fr) over the guide wire using rotatory screw movements of hands; (C) dilator and guide wire should be in straight line and any guide wire kinking or buckling of kidney is avoided; (D) Malecot in place with its opened flower end
Step 6: tract dialatation
With help of No. 11 surgical scalpel, tract is incised by sliding scalpel over needle until dorsolumber fascia is incised. Tract then is dilated up to 14 F using single step fascial dilator over the guide wire using rotatory screw movements of hands [Figure 5B]. Care should be taken to avoid kinking of guide wire or buckling of kidney [Figure 5C].
Step 7: insertion of nephrostomy over guide wire
In a similar fashion and direction as used during tract dilatation nephrostomy tube is inserted with screwing movement of hands (avoid pushing) over the guide wire until it reaches well into the pelvis. We generally prefer to use 14 F Malecot catheter as nephrostomy tube, as it is self-retaining and less chances to get blocked due to its large diameter even in infective conditions like pyonephrosis. Once in place Malecot catheter inner occluder is opened and flower rotation should be appreciated under fluoroscopy guidance [Figure 5D]. Though it’s self-retaining, we still prefer to further stabilize nephrostomy with skin using non-absorbable suture material and adhesive strapping. Once done occluder is taken out with the guide wire and attached to an external drainage bag. Final position of Malecot catheter is confirmed by repeating dye study. USG should be done at the end to see decompression of pelvic calyceal system as well position of nephrostomy tube.
Post procedure care
Vitals should be recorded every half hourly for first 6 h post procedure. As the most important indication for nephrostomy placement is obstructive uropathy, so after decompression diuresis is expected in these patients mandating close monitoring of urine output and electrolytes. Bed rest should be advised for around 4 h with recommencement of the preprocedural diet. If sepsis is suspected, a broad spectrum injectable antibiotic is started round the clock. Nephrostomy tube should be checked for its patency periodically and if blocked can be gently washed with diluted 5 mL betadine/antibiotic solution.
Other methods for gaining access
Fluoroscopy guided access
A complete opacification of the system is done using the chiba needle and thereafter access is gained in the appropriate calyx[6].
MDCT guided access
In cases where the collecting system is complicated with difficult anatomy MDCT guided access is valuable with added advantage of delineating abnormal anatomy with respect to surrounding viscera and access site. Main limitations are its availability and radiation exposure[7].
Advantages of ultrasound guided technique
(1) Reduces radiation exposure both for operating staffs and patients; (2) decreases need for contrast media; (3) decreases chances of major adjacent viscera organ or major vessel (color doppler) injury; (4) can be performed in supine position; (5) can be done safely in pregnant, pediatric patients; (6) method of choice in transplant kidney and ectopic kidney (reduces chances of bowel injury); and (7) overcomes the problem of unsuccessful retrograde ureteral catheterization that is required for contrast media injection in fluoroscopic guidance.
Disadvantages of ultrasound guided technique
Technically challenging for novice as well in case of mild or no hydronephrosis.
Tips and tricks of successful ultrasound guided puncture
(1) Proper positioning and surface marking as described; (2) correct identification of posterior calyx; (3) use puncture guide during puncture of desired calyx; (4) use diamond tipped needle instead of beveled tipped needle during puncture; (5) in case of inadequate dilatation of pelvicalyceal system diuretic can be given preoperatively; (6) during puncture one should appreciate full course of needle along the puncture guide; (7) once calyx is punctured and dye is instilled, the target calyx should be opacified first followed by pelvis and other calyx; (8) placement of guidewire through the target calyx into ureter or upper calyx; and (9) always perform repeat ultrasound at end of procedure to see for any residual hydronephrosis which may require another PCN placement.
Complications
(1) Hematuria: virtually every patient have some amount of transient hematuria but only 1-3% of those patients require transfusion, surgery, or embolization. If noted at the time of nephrostomy itself, can be controlled by applying tamponade over the nephrostomy tract[8]; (2) pain: this is also one of the common complications, can be controlled by oral/IV analgesics; (3) sepsis: PCN insertion in pyonephrotic kidneys can result in severe bacteremia and sepsis; (4) injury to adjacent organs: pneumothorax and colonic injury are rare but are known complication especially in supracoastal punctures; (5) extravasation of urine; (6) catheter dislodgement; and (7) inability to remove nephrostomy tube due to crystallization.
Conclusion
USG guided technique of PCN placement is safe, effective and easily reproducible if done with correct technique though it requires some degree of learning curve to overcome to become competent in this technique.
Declarations
Authors’ contributionsStudy conception and design, drafting of the manuscript: A. Jairath
Drafting of the manuscript, critical revision: A. Ganpule
Critical revision: M. Desai
Financial support and sponsorshipNone.
Conflicts of interestThere are no conflicts of interest.
Patient consentNot applicable.
Ethics approvalNot applicable.
Copyright© The Author(s) 2017.
REFERENCES
1. Goodwin WE, Casey WC, Woolf W. Percutaneous trocar (needle) nephrostomy in hydronephrosis. J Am Med Assoc 1955;157:891-4.
2. Dyer RB, Regan JD, Kavanagh PV, Khatod EG, Chen MY, Zagoria RJ. Percutaneous nephrostomy with extensions of the technique: step by step. Radiographics 2002;22:503-25.
3. Millward SF. Percutaneous nephrostomy: a practical approach. J Vasc Interv Radiol 2000;11:955-64.
4. Desai M. Ultrasonography-guided punctures-with and without puncture guide. J Endourol 2009;23:1641-3.
5. Ota-o N, Jairath A, Mishra S, Ganpule A, Sabnis R, Desai M. Percutaneous nephrolithotomy in pelvic kidneys: is the ultrasound-guided puncture safe? Urology 2015;85:55-8.
6. Steinberg PL, Semins MJ, Wason SE, Matlaga BR, Pais VM. Fluoroscopy-guided percutaneous renal access. J Endourol 2009;23:1627-31.
7. Ghani KR, Patel U, Anson K. Computed tomography for percutaneous renal access. J Endourol 2009;23:1633-9.
Cite This Article
Export citation file: BibTeX | RIS
OAE Style
Jairath A, Ganpule A, Desai M. Percutaneous nephrostomy step by step. Mini-invasive Surg 2017;1:180-5. http://dx.doi.org/10.20517/2574-1225.2017.24
AMA Style
Jairath A, Ganpule A, Desai M. Percutaneous nephrostomy step by step. Mini-invasive Surgery. 2017; 1: 180-5. http://dx.doi.org/10.20517/2574-1225.2017.24
Chicago/Turabian Style
Jairath, Ankush, Arvind Ganpule, Mahesh Desai. 2017. "Percutaneous nephrostomy step by step" Mini-invasive Surgery. 1: 180-5. http://dx.doi.org/10.20517/2574-1225.2017.24
ACS Style
Jairath, A.; Ganpule A.; Desai M. Percutaneous nephrostomy step by step. Mini-invasive. Surg. 2017, 1, 180-5. http://dx.doi.org/10.20517/2574-1225.2017.24
About This Article
Copyright

Data & Comments
Data


 Cite This Article 85 clicks

 Like This Article 17
likes
Like This Article 17
likes


Comments
Comments must be written in English. Spam, offensive content, impersonation, and private information will not be permitted. If any comment is reported and identified as inappropriate content by OAE staff, the comment will be removed without notice. If you have any queries or need any help, please contact us at support@oaepublish.com.